|
Liquid Sculpey – Faux Agate Slice Coasters
Supplies:
Liquid Sculpey Bakeable Medium
Sculpey Clay Tools Starter Set
Sculpey Liquid Clay Softener and Thinner
Additional supplies:
Paper towel
Small silicone baking cups or small glass dishes for mixing liquids (2)
Chunky glitter in iridescent, blue iridescent, and purple iridescent
Silicon agate shape divided mold
Heat gun - optional
Small sharp craft scissors
STEP 1
Getting Started with Liquid Sculpey:
Please make sure your work area is covered and
you are not working on an unprotected surface. We recommend working on the
Sculpey® Oven Safe Work Mat, wax paper, metal baking sheet, or disposable foil.
Uncured Liquid Polymer Clay may damage unprotected furniture or finished
surfaces. Be sure to cover your crafting area appropriately. - Stir Liquid
Sculpey® completely. Thin with Sculpey® Liquid Clay Softener as needed - Wash
hands after use (we have found that baby wipes work best)
Baking:
• It is important to use oven thermometer when
you bake the liquids so that you can ensure your oven is at the correct
temperature.
• Do not microwave the liquids. They must be
baked in a Preheated oven at 275 ºF (130 ºC) for liquid colors and 300 ºF (149
ºC) for Clear – Do not exceed baking temperatures.
• If your piece is less than 1/4” bake for 15
minutes. For thicker pieces that are 1/4” or above bake for 30 minutes.
• If your liquid project has become yellowed
or discolored in the oven, when you remake it, tent it by placing either –
folding an index card in half and placing your project under it or by using
aluminum foil over your project.
STEP 2
Stir all the liquids carefully. If any of the
liquids feel like they are overly thick, they can be thinned by adding a few
drops of Sculpey® Clay Softener and Thinner to the bottle. Just add a few drops
at a time to make sure the thinner is mixed in completely. After stirring, lift
your stirring tool out of the Liquid Sculpey® (LS) and see how quickly it drips
off of the stirring tool. This is a good indication of the thickness of the LS.
You can use this lift and drip technique to compare the thickness of the
liquids to each other. Projects usually have the best success if the liquids
are comparable to each other in thickness. Especially projects like this one
where we want the lines between the colors to blur a little with partial
mixing.
To start the agate look, fill the very inside
corner of the four parts of the mold with Peacock Pearl. Try to make the
outline of the Peacock Pearl as random and natural as possible so it looks
organic. As we apply more colors to the mold, we will do our best to keep the
edges of the colors in an organic pattern instead of straight and rigid.
STEP 3
Pour a small amount of Translucent Turquoise
LS in a small silicone baking cup. Add iridescent blue chunky glitter and mix
it in completely. I stirred the amount shown in this photo completely into the
Translucent Turquoise and then I added this much again and stirred it
completely in. I want the liquids to be fairly saturated with the chunky
iridescent glitter so that it really shows up after baking. Wipe tools clean
with paper towel.
STEP 4
Add the iridescent Translucent Turquoise to
the mold next. It should touch the outer edge of the Peacock Pearl and then
spread organically outward. As we add colors we don’t have to be concerned
about filling the mold completely to level just yet. We can do that later. For
now, we just need to mark the space that we want with each color.
STEP 5
Squirt a bead of White LS next touching the
edge of the iridescent Translucent Turquoise.
STEP 6
Continue adding thin beads of color. A bead of
Translucent Turquoise (without glitter), Gold, Peacock Pearl, and another bead
of White LS.
STEP 7
Next make sure the Clear LS is stirred
completely well. Clear LS will have a layer of sediment that naturally forms in
the bottom of the bottle. This sediment layer needs to be mixed completely back
into the liquid layer in order for the Clear LS to be ready to use.
Pour some Clear LS out into a silicone cup or
glass dish. Add iridescent chunky glitter saturating the LS with glitter. Mix
in really well. Wipe tools clean with paper towel.
STEP 8
Add a wide band of the iridescent Clear.
STEP 9
Add a bead of Peacock Pearl to the very
outside of the mold shape leaving a gap between it and the iridescent Clear
band.
STEP 10
Pour Translucent Turquoise into another mixing
cup. Add iridescent blue and iridescent purple chunky glitter to it and stir in
completely. Wipe tools clean with paper towel.
STEP 11
Add the purple/blue iridescent Translucent
Turquoise to the space between the iridescent Clear and the Peacock Pearl.
STEP 12
Add a bead of White and a bead of Gold just
inside the outer Peacock Pearl edge.
STEP 13
Tap the mold on your work surface to help the
liquids fill in all the gaps and to release air bubbles. Look for stubborn air
bubbles that can be released with the Needle Tool. Back fill the mold to level
by filling more of each color on top. Tap the entire mold again on the work
surface to release air bubbles. You can also create some slight movement among
the colors by gently lifting and then dropping the mold straight down onto the
work surface. This slight movement helps the edges of the colors to blend
slightly.
STEP 14
Bake the filled mold following the baking
instructions for Liquid Sculpey®. When the piece comes out of the oven the
colors will be so bright and pretty.
STEP 15
Anytime I work with any of the translucent or
Clear colors of Liquid Sculpey®, I like to pump the colors up a notch by
hitting them with my heat gun. While the mold is still hot from the oven, I use
hand protection to transfer the baking sheet with the baked items on it to my
heat gun area. Once again, I do this while the mold is still hot to take
advantage of the heat that is already in place from the oven. Then I turn my
heat gun to the hi setting and I apply heat to the molded pieces until the
Clear areas turn really clear and shiny and the translucent areas deepen in
color. Then I remove the heat.
STEP 16
Also, after my first baking, I felt like my
mold could have been fuller. Once the mold was completely cool, I backfilled
all the low spots in my mold with Clear LS and baked it a second time. After
the second baking, I made sure the Clear LS that I added was completely clear
again with my heat gun.
This photo shows the side of the project that
was face down in the mold.
STEP 17
This photo shows the side of the project that
was the open side of the mold. Both sides have been additionally heated with
the heat gun.
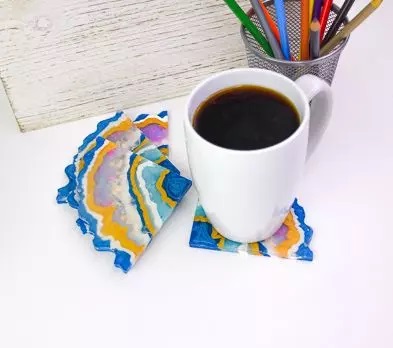
STEP 18
A look at the finished coaster set.
If you find that there are any rough edges to
your baked pieces, these can be cleaned up with small sharp scissors.
|
